Website powered by

Dev Blog - Project Geneva #04 - [Indecisions]

General / 07 March 2020


Small announcement ... kinda

The title says it all .... since the last blogpost I really couldn't get my mind straight. Here is why and how I'll proceed with this.

There are so many open tasks on this project and so little time to finish them, that's really grinding my gears. Every day I wake up, being motivated to finally do that damn tasks that's been nagging on my mind for a long time now ... but ... I get distracted, demotivated right after starting or my mind goes blank. I think that's what people call 'Artblock' or 'Project Blindness'.

So I decided to do the following: After writing this post today I'm going to take a few weeks off the project. A fresh breeze can work wonders! :D And I really hope stepping away from this to work on something else, or just chill for a few weekends will work to get me back on track with a clean mindset (at least I hope so).

Unfortunately that also means that this series will be paused for some time ... Probably the next 2 posts will only be short updates, but most likely there won't be any at all. Taking a months worth break delays the project quite a bit and then I need to generate some content first, before being able to post again ... makes sense right? :D

Updated stuff ... yeah \o/

OK ... 'bad' news are over, now let's see what I managed to do since the last proper update! 

As always here's a short list, followed by some screenshots:

  • Fiddled around a bit more with Lighting & PPs --> Just wasn't really happy and decided to go a bit of a different route after some feedback from a good friend & colleague ... more info in an upcoming post, when I had time to adjust some assets to fit the new setup.
  • Built and added a small BP system for signs --> Signs .... they are everywhere in stations (hopefully :3) ... this enables me to quickly iterate the intended path / flow of information for the potential players
  • Placed some more Decal-Normal-Trims --> Those add some more depth / detail to the overall look ... still a lot more to place though :D
  • Blocked vertical sliding doors between the 'transition' and the 'control point' areas --> Encloses the space a bit more, reduces sightlines and enables me to make the transition between sci-fi and more natural materials smoother (more logical) <-- more information following after the break!
  • Decided to scrap the stair lifts and replaced them with escalators --> More variation, also escalators make a lot more sense ... and I just wanted to build some escalators yesterday xD
  • Started to outline some more natural materials in Substance Designer --> Stay tuned, the exact use will be made clear in a later post!
  • Some small changes in module placements / map geometry --> resulting from the before mentioned changes or in preparation for some upcoming stuff.

WIP Screenshots 

Finally the interesting part again. This time I'm just going to show the highlights, instead of the usual WIP cameras ... enjoy!

UE4 Screenshot - More Normal Trims

UE4 Screenshot - Procedural signs made with BP construction script and decals

UE4 Screenshot - Door blocking, still undecided if it's gonna be partially see-through or not :D

UE4 Screenshot - New look of the transition area ... of course the escalators are working, you just have to believe me :3

Substance Designer OpenGL Screenshots - Sandstone Tiles [L] | Rough Wood [R]

What's next?

As mentioned in the beginning, I'm taking a break, since I myself am not satisfied with my current progress and hope some time off may rekindle my motivation and helps me to overcome the artblock. Still ... look forward to my next post, I plan something big for that one (maybe)!

Feedback is as always very much appreciated, also if there are any questions you can still ask me, even while I'm on the break, don't hesitate! :D

Thanks again for reading through this, hope you enjoyed it.

Cheers!

Spotlight - Project Geneva #02 - [Details]

Making Of / 22 February 2020

Hey everyone, it's time again for another blogpost! As I already kinda spoiled on Twitter yesterday, this will be another 'Spotlight'. My job and Final Fantasy 14 just took up way to much of my time ... especially FF14. :D Also please note that all I'm gonna show you now is pretty early WIP, polishing will come ... well I don't know when. xD

Overview

Today I'm going to show you the Mesh-Decal-Normal-Trimsheet workflow I'm using in this project. I'll cover all aspects and some neat little 'Tips & Tricks' I discovered along the way. Here is a short list of stuff I'm going to cover:

  • Alpha & Hardsurface generation in Substance Designer
  • Alpha & Normal baking in 3ds Max
  • Trimsheet creation in Substance Painter
  • Mapping the meshes on the trimsheet
  • Material Set-Up & usage in UE4

Along the way I'm gonna show screenshots of each process and explain how I made it work for my specific use case. I'm glad you are following along, let's hop straight into this!

Generating all the ressources

I started with creating a bunch of simple (or medium complex) shapes inside Substance Designer. I chose SD because I'm pretty familiar with it and can generate every map needed (For my case mostly Normal and Opacity) directly out of the shapes created. 'Procedural Texturing' FTW! \o/ 

You could basically do the whole process in Photoshop as well though, just pick whatever software you are most comfortable with. I kinda went a bit overboard with creating alphas & normals and it quickly got out of hand ... as you can see in the screenshot below.

Here are the ones I'm actually planning to use in the project. As you can see, i trimmed the trims (pun intended :3).

At this time I took a small break, searched up some references and analysed them ... to be honest ... I should have done that from the  start. I built a bunch of useless shapes - or shapes which didn't work well in general - and wasted a lot of time. Well stuff like this happens, it's always a back and forth. This was also the point when I decided to model and bake the 'more complex' shapes in 3ds Max and then bake them down to a plane.

The neat thing about this method is, that you can go really crazy, as long as you keep a couple of things in mind. The most important thing is -  Normalmaps need slopes, bevels and gradients to work properly! Don't ever model in perfectly straight 90° angles ... you won't get the results you are looking for. Also you can go ham with the polycount, since you are basically building highpoly models ... so just go for it!

Assembling the trimsheet

Ideally you would want all of the single trims ready by this point, but your mind on which to use can change pretty quickly (trust me I've been there). So I started assembling while still baking and generating even more shapes. To be flexible and adaptable to changes was also one of the reasons I decided to assemble the trimsheet in Substance Painter. It gave me great control over where which trim should be placed and I didn't have to worry about any extra work, since I just placed normal and opacity maps at the same time.

The 3D viewport was pretty handy as well. I could just check the results directly in a realtime environment, which made adjustments easy and errors - or suboptimal stuff - pretty obvious. To aid me with placing all the single trims I quickly built a grid texture in SD. I know that my placement with this grid is not the best solution, but it would guarantee me an even distribution and fast iteration opportunities.

I could easily erase and swap out different trims without having to worry about them fitting in or overlapping with others ... it's just a convenience thing. The grid also helps me to create a 'cheatsheet' afterwards. Here I can see which plane in my engine will be what decal.

Mapping geometry to the trimsheet

This task can vary from simple to annoyingly tricky. First I loaded the trimsheets opacity and normal into 3ds Max and mapped them to a 2x2m plane. Since I worked on a grid inside SP I could just subdivide the plane to perfectly match my grid. This enabled me to simply cut out each individual trim and clean them up. This task would have been way more time consuming if I hadn't been working grid orientated.

The planes you see above are mostly for quick testing uses inside UE4. With them I can try what works well and can break up the modularity of certain parts by adding them on top of the actual mesh in the engine. Most of them will be added to the final meshes before I export them to UE4 though. 

Those planes alone are a great start to get some details going, but my choices of what to place where (especially where) still were limited. So I decided to add some 'custom' mesh decals into the mix. What do I mean by that? It's simple ... I wrapped some planes around certain parts of already existing meshes and mapped them onto the trimsheet as well. And voila ... I'm now having mesh decals which wrap around corners and fit perfectly onto certain parts of my level geometry. 

This method can't only be used on the tiling trims at the bottom of my sheet, you just need to get creative with UVs and topology. On the next screenshot you can see the same trim being mapped to different geometries. To not stretch the corners of the trim I simply used some support loops ... those work almost the same as traditional support edges in highpoly modelling. You just gotta cheat your way through! :D

But keep in mind to not overextend the use of this, figure out the limits! If you squash 4m of geometry onto something like 20 pixels ... well you know what happens then. 'RIP TexelDensity'

Setting up the material in UE4 and finally using them

It's finally time to see the fruits of our labour! :D (But not without some more work to be done first.)

UE4 has some neat features regarding decals and blending of them. This methods only works (as far as I know) when you enable deferred decal rendering in your project settings. Let's have a look at some of the materials features and how I set it up:

  • Blending only the normal pass over the other maps
  • Setting intensity of the normal details
  • Inverting the normal details
  • Automatically adjusting the normal intensity based on the distance from the player camera
  • Ability to swap normal & opacity maps

So now, let's have a look at the material and the instance. It surprised me, but it's rather small.

I had to implement the 'distance-normal-intensity-adjustment-thingy' cause my decals tended to completely fade out once you were a couple of meters away from them and I didn't find any settings to fix that ... so I just built it directly into the material. If it works ... it's good enough! :D

And finally ... here are some screenshots of actual used trim decals inside UE4. Took me long enough to get to this part in the post. :D

What's next?

Well ... that's easy ... generating, baking and placing more of them! Yay ... someone has any good Netflix recommendations for me? :D

Also I hope you liked this short breakdown and got some insights into how I achieved the results you saw and will be seeing in the future. If you have any questions - as always - don't hesitate to ask! I'll try to provide answers and help where I can.

Thanks for sticking through this, feedback is always appreciated!

Cheers and have a great day / evening / night :D

Dev Blog - Project Geneva #03 - [Progress]

Work In Progress / 08 February 2020

It's time for another post ... this one is a normal 'Dev Blog' again! Yay \o/

Update

As you probably guessed from the title, I had some time to work on it again. :D Most of what I did was focusing on the actual track area, but also remodelling some already integrated props and blocking out a couple of new ones. I'm currently exploring where I can put what. So to see what works well together I'm back to the blocking phase in some parts of the map...

Here is a short list of changes before we get into the screenshots:

  • Remodelled the upper floor railings / barriers --> Now they fit better into the overall style
  • Finally decided to scrap the cellar floor --> I know I never mentioned it here ... but it was there (at least in a rudimentary blocking state xD
  • Added vents and air shafts to the ceiling above the track --> This change gives the whole area a lot more character
  • Added Pipes to the same ceiling and to the bottom sides of the track --> Same reason as above, also the secondary accent color makes it 'pop' a little more
  • Reworked the BG area behind the track --> It looks more interesting, is clearly marked of and the potential player won't get to distracted by it
  • Remodelled the screen monitors --> They fit in better now and open up more opportunities for BP / Material games :D
  • Remodelled some of the track side barriers --> Mostly to make it more interesting and to 'hide' some pipes
  • Added blockings for the following: Big ad/info screens, clock, modular benches, ... and maybe a couple more
  • Built and added a small BP system for the hanging banners --> This enables me to freely change between variants without having to drag different material instances on it ... I know it's kinda unnecessary, but I had fun building it xD

WIP Screenshots

Ok I think that's most of the changes (at least the 'important' ones). Now have fun by exploring them yourself!

UE4 Screenshots - Spawn Room

-----

UE4 Screenshots - Transition

-----

UE4 Screenshots - Control Point 

Since most of the changes are pretty subtle on the usual WIP screenshots, here are some more close ups:

UE4 Screenshot - Track side BG close to spawn area

-----

UE4 Screenshot - Track side view from CP

-----

UE4 Screenshot - Track side BG 'details'

-----

UE4 Screenshot - Transition 'details'

What's next?

Hmmm ... I guess I really should start with doing at least some of the UV work, but maybe I continue to explore or build those DetailNormal Trims. To be honest I don't really know, I probably just keep working on the parts I have the most fun with. :D

Also I had the idea to record a little fly-through, just so people can get an overview of the whole map extends, etc... Would you be interested in something like that? For when the map is finished (lel ... we'll see about that) I'm already planning a neat little cinematic, so don't expect to much from the fly-through. xD

Hope you liked this blog post, if you have any feedback or suggestions I'm always glad and grateful to hear them! 

Cheers :D

Spotlight - Project Geneva #01 - [Trains]

Making Of / 25 January 2020

Heya all ... finally it's time for one of those spotlights \o/. Hope you enjoy!

To be honest I didn't plan a spotlight post for today, but my schedule got kinda scrambled around a bit. I literally didn't get any noteworthy progress in on the project itself, but still wanted to continue the bi-weekly posts. :D

The reason for this? On January 14th Substance announced and started their next Substance Painter contest ... and I just had to join in on the fun! #MeetMAT2 is a great chance to learn, network and generally just have fun. Definitely head over there and check out all the great WIPs on Twitter & the Substance Forums from artists around the world. :D

Today's topic?

Trains ... yes seriously trains. As I, either said somewhere before or most of you have figured out by themself, 'Project Geneva' is basically only a train station ... and what would a train station be without trains? Ye ... kinda lame.

That's what I thought as well, so a couple of months ago, when I didn't want to model, unwrap, texture, etc... I just sat down and fiddled around with blueprints in UE4. I'm not completely new to the system, but for something that intertwined with different parts in the level it still took me a lot of trial and error.

Also ... it's probably nowhere near perfect ... please don't hang me @programmers :3

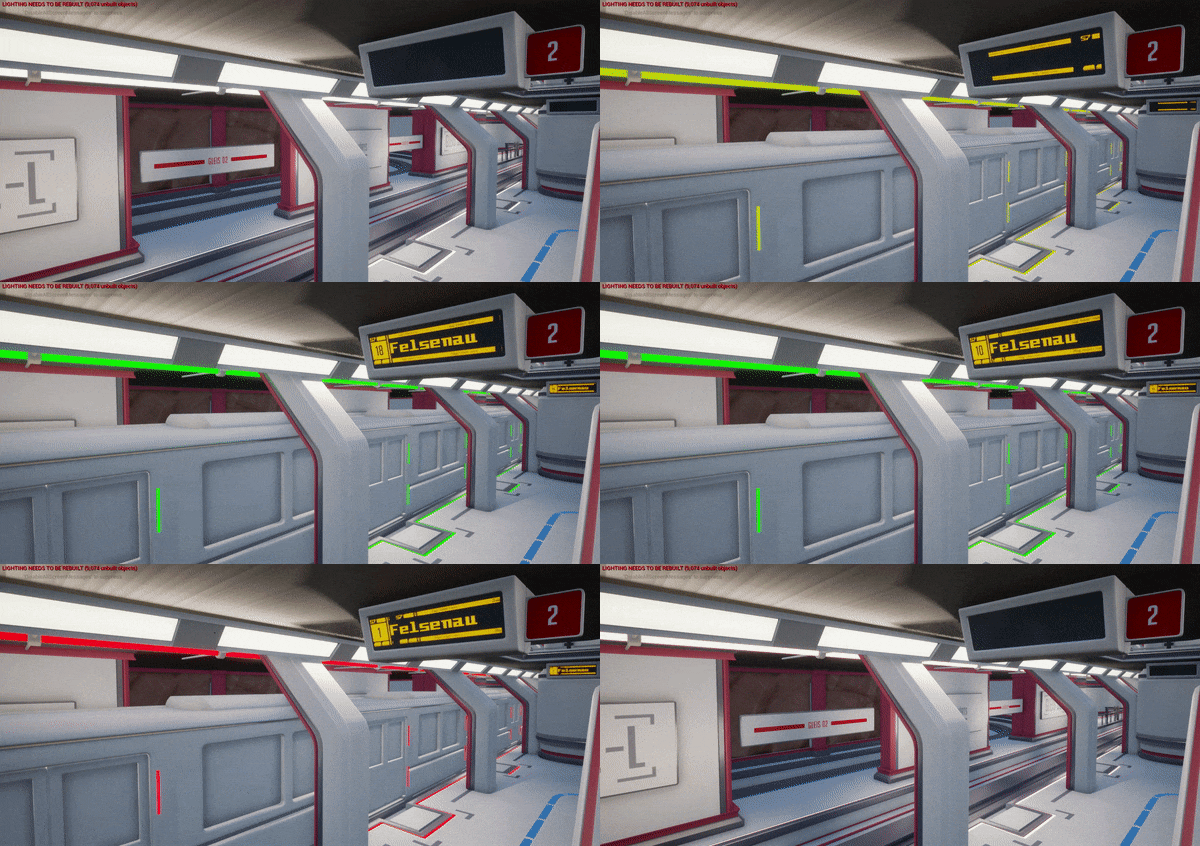
Today I'm gonna show you what this blueprint controls, how it works and what routes I chose to build it. First up here is a little .gif for you:

Train System Example [Speed: 1.5x]

What features are built in for now?

  • Spawning trains on both tracks in different intervals
  • 50/50 chances of them stopping or moving through
  • Track display sequences for both options
  • Safety LED lights on the track something's happening
  • Some useless stuff, like decal colors?! ... why? don't ask me :D

The components & What's happening

So what different components / blueprints are interacting with each other? The answer is ... 6 (I think), let's see them in a list:

  • Control BP - just chilling in the centre of the map - controlling everything
  • Train BP - this one obviously gets spawned
  • 3 different kinds of platform border modules - function to check which track they are on
  • Track screen BP  - basically the same functionality as the border modules
  • Ceiling LED tube BP - again the same functionality

Ok ... well it's 7 different BPs communicating, but most of the communication isn't directly BP --> BP. Cause let's be honest, I'm an artist, so I'm gonna do it the 'creative' way. :D

The only really BP --> BP communication is the spawning & de spawning of the trains itself. The rest is handled via 'Material Instance Parameters', cause ... ye it's only changes in materials. The only reason stuff like the border modules, etc... are considered a BP by me, is that I needed to be able to set on which side of the platform they'll gonna be placed. 

Modular border piece BP | In editor variables [Corner]

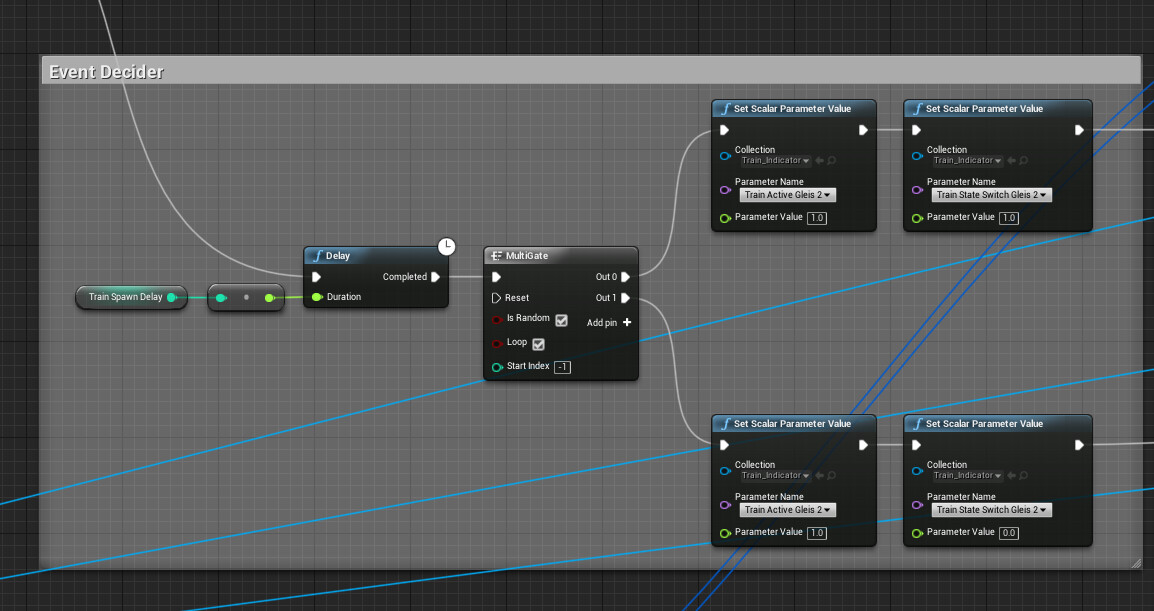
Even though this is one of the most simplest event graphs ever created in UE4, it still took me a while to figure this one out, so it would work flawlessly. And all of that, because I wanted it to be random, if the trains are stopping or moving through, in addition of them arriving in different intervals. :3

The real heart of this system is the 'Material Parameter Collection' ... you can find this one in every of the materials and the parameters are set in the big 'Control BP'. After testing a bit this was the best method I could come up with to achieve this kind of communication between assets and still have it quite easy to change stuff later on, without breaking something.

Material Parameter Collection 

For an example on how I used this, here is a screenshot of the most complex material involved in this:

Static & Moving Parts Material [TOP] | Timer Material [BOT]

So now, that I briefly gone over all the different components let's jump into how it's all connected. :D

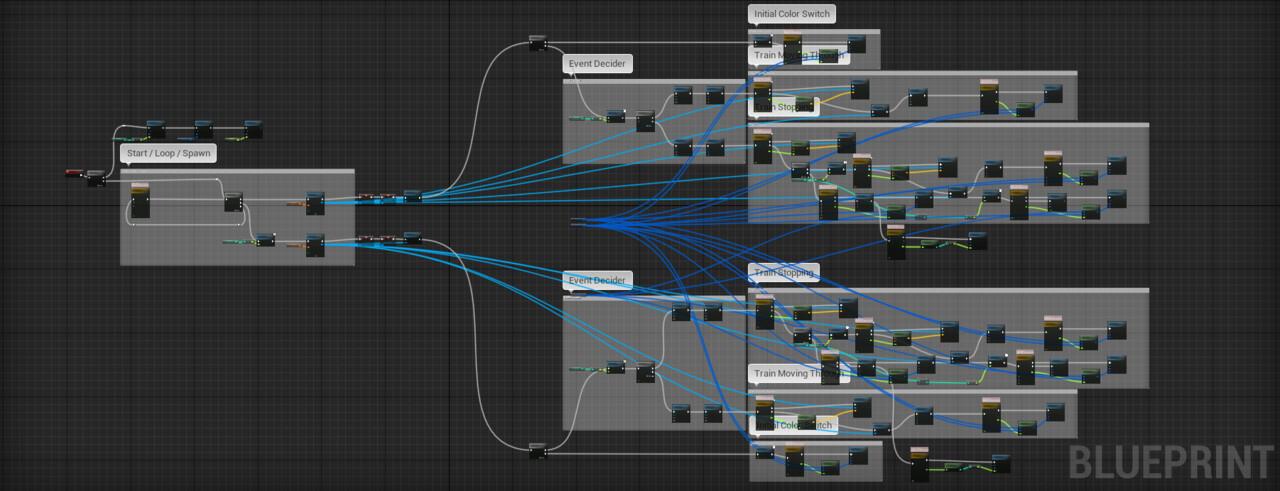
The big boi

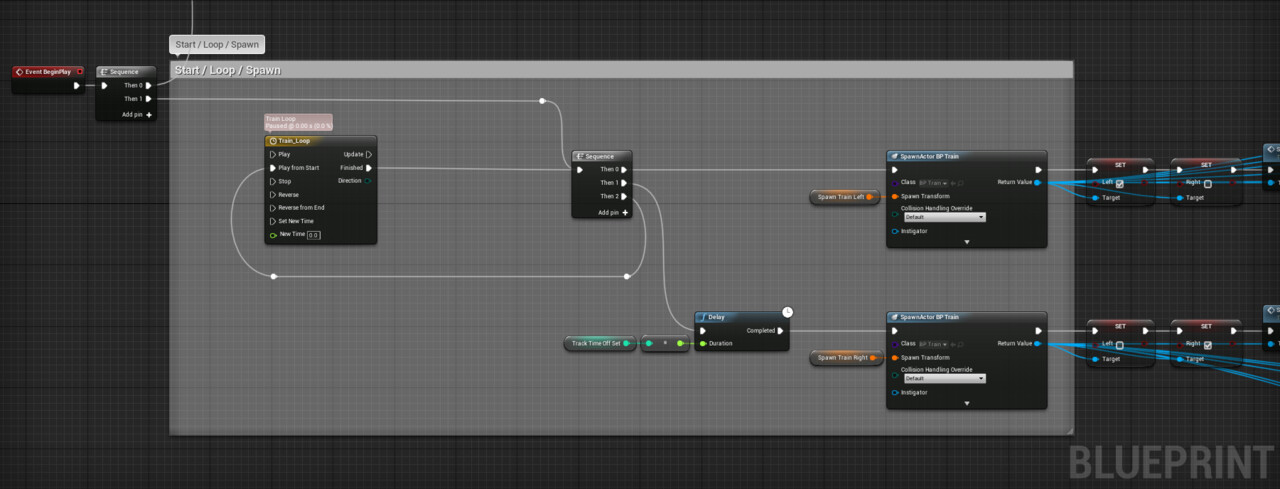
The 'Control BP' might look a bit messy to you, but well ... I tried to build it as organized as possible. First up let's look at the whole thing, then I'm gonna break some parts down into smaller segments. Prepare for a flood of images. :DMain Control BPInfinite Looping of the SystemSimple Event Decider for 'Moving' or 'Stopping'

Event Graph for the moving train

Event Graph for the stopping train

All of those segemnt screenshots (except for the looping) are present for each track individually. There's still a lot of tweaking & polishing to be done, but for a working prototype and the state the project is in currently, it's working out fine.

Conclusion

That's it for the first spotlight (at least for now). Please let me know if something was written / described kinda confusing, or if you want to know a bit more details about some of the parts I've shown in here. I'm always glad to receive questions and / or feedback!

Also if there are some @programmers (or other people who are more proficient with UE4's BPs) please let me know what you would have done differently. 

Hope you enjoyed it or even learned something ... even though this spotlight was kinda improvised, to not break posting schedule. :3

Cheers and have a great day / evening / night!

Dev Blog - Project Geneva #02 - [Experiments]

Work In Progress / 11 January 2020
Heya all, hope you had a nice and relaxing holiday. :D 

it's that time again ... the next update on my Overwatch fan made map, enjoy!

Colors \o/ ... bye bye grey!

Finally I found some time over the holidays to mess around with some material studies. Mind you those are nowhere near final ... (yet). The materials are mostly created directly within UE4 (except some grunge maps). This way it's possible for me to easily texture some of those huge modular pieces and still have consistency throughout the whole map, without any real hassle.

One of the few 'unwrapped' pieces ... ignore the silver parts though :D

The most painful part was to find and balance the color scheme ... to be honest ... that's probably one of my biggest weaknesses. Thanks to the help & feedback from some colleagues and friends the groundwork is now basically almost done. But, I'm open for any suggestions! Probably will first touch it again after all the pieces are unwrapped and the lighting has gone a little bit further.

Ahead of showing the, - well - 'usual' WIP cams, here is a quick overview of the master material used for the modular pieces:

  • The basic stuff ... Color, Roughness, etc... with grunge variations and a mask driven selection
  • Base-Normal & Detail-Normal blending ... with UV and intensity parameters
  • An additional, blendable detail layer ... with Color and Normal
  • And the biggest thing ... a curvature mask to slightly highlight edges in a certain range


M_OWBase_Opaque_Master

-----

MI_OWBase_LGrey

Let me know if you want to learn more about this material. In case you do, I'll try to throw in one of those 'mystery' spotlights I have talked about a couple of times now, going through it step by step. :D

Chores & smaller Updates

UVs ... let's be honest ... I didn't do them (yet). Instead I fixed the geometry on a couple of modular pieces and finished the detail modelling on other ones. But I also did some more explorations with the limited space I have. For example I planned to add some more 'nature' to the scene ... well nature as in rock walls ... 

I also expanded the space at the ground level a bit by adding a second bypass track on one side of the platform. This track won't be directly accessible, but should add some more depth and interesting features to the scene. For now the rock walls are only height map based ... sculpted rocks will be coming soon. :D

WIP Screenshots

UE4 Screenshots - Spawn Room

-----

UE4 Screenshots - Transition

-----

UE4 Screenshots - Control Point 

Oh yeah ... please don't mind my test objects smacked in the middle of the control point, they will off course be removed later on. :D 

And as you probably noticed, I implemented some of my older Overwatch fan art assets, just to have a general idea how they will look and fiddled around with the lighting a bit. Currently playing with the thought of remaking most of the assets for this project.

What's next?

Well ... everything ... nah just kidding. For now I'm mostly focused on finishing tests on my rock wall idea, but after that it's UVs. Following that lovely part of 3D production there have to be some adjustments to materials (probably), etc... but then I'm planning on creating some DetailNormal TrimSheets.

Hope you liked this instalment of the Dev Blog series ... as always feedback and suggestions are very much welcome!

Cheers :D

Dev Blog - Project Geneva #01 - [Status Quo]

Work In Progress / 28 December 2019

The true start

Welcome to the second instalment of my 'Dev Blog'. Glad you found your way to this one!

Well ... technically it's the second one, but it's the first one with 'real' content about the project, hence #01. Also this will be the last post this year (obviously). :P

So here we go ...

Overview

Let me give you a bit more information about this project. 

'Project Geneva' is the current working title of my custom Overwatch map. It won't only try to match the iconic artstyle as closely as possible, but will also inherit some basic game design concepts. The map will focus to incorporate a couple of elements typically found on Overwatch's 'King of the hills' playstyle maps, also known as the game mode 'Control'.

Typically those maps are built symmetrically and are split into 3 single maps with one control point each. 'Project Geneva' will represent one of those smaller maps and will have the control point in the middle of the map. 

For the setting I chose a subway station ... I figured out later, that those places can be a bit of a pain to design, especially if you are trying to build a fun and fair FPS map for two teams with a central objective. What was the problem? Sightlines ... oh boi is it hard to make a space look interesting and make it work at the same time, when it's this enclosed and stretched. But well, enough of that ... I'm gonna post the design process later on in another issue of this series.

Here are some more interesting details and features I plan(ned) to have in this map:

  • A unique environment obstacle, which kills players who don't pay attention ... I let you guess what that might be :D
  • Indirect storytelling will be implemented ... most likely something about the 'Omnic Crisis'
  • The map will be directly linked to one of the heroes
  • Despite it being heavily influenced by the current sci-fi maps in Overwatch, it will also house some classic elements, which most people might associate with the town and country it's located in
  • And of course ... all the other stuff you can commonly find in a subway station ... small shops, vending machines (a lot of vending machines - who doesn't like breaking them in the game?!) and many other - sometimes kinda crazy - things

Let's get down to some more technical stuff:

  • Modelling will mostly be done in 3ds Max, with some assets getting an additional sculpting pass in Zbrush
  • For texturing it's a bit harder to specify ... Materials will mostly be made in Substance Designer, with some being made in Unreal Engine 4 - the texturing will then happen in Substance Painter ... some masks, alphas and decals will also utilize Phtotoshop
  • The game engine in use is Unreal Engine 4.23 ... I might update the project later on, but will most likely stick to this version
  • Mechanics and other technical stuff will be build using UE4 blueprints ... but getting a coder on board isn't completely ruled out yet

Status Quo

Currently I'm working on a couple of fronts. The biggest one is 'detail modelling', but there is also some more blocking to be done, also I started to set up some base materials in UE4. I know this might not be the best approach, but I needed some changes while working on this. Sometimes I just want to model, other times I feel more like doing a bit of blueprint work ... as long as you keep track of what needs to be done, do whatever you like.

It's more important to have fun and not loose motivation on such a big project, than pushing every step to the limit from the beginning!

Ok ... after all this text, here are some screenshots for you to (hopefully) enjoy. :D (They should be big enough to enlarge them a bit.)

UE4 Screenshots - Spawn Room

-----

UE4 Screenshots - Transition

-----

UE4 Screenshots - Control Point

What's next?

Those angles in the screenshot above ... you will see more of them. They are fixed WIP cameras I set up in the scene ... thought it's gonna be easier to document and follow along, if the screenshots can be compared to each other - without the influence of different angels and perspectives.

And of course I'm gonna fix all the gaps in-between the modular pieces ... but maybe more colours next? I honestly can't stand all this grey any more....

Let me know after the next couple of posts, if this is a good idea or if I should only focus to highlight the major changes. :D

Cheers :D


Oh I almost forgot ... hope you had an awesome Christmas and I wish you a happy new year! May the next decade be full of awesome stuff!

Dev Blog - Project Geneva #00 - [Intro & Announcement]

Work In Progress / 14 December 2019


Background

Some time ago (actually it's now probably around 2 years) I had the idea to realize a huge project. I was (and still am) a huge fan of Overwatch and thought about the possibility of creating my own map. I knew it's gonna be a huge chunk of work ahead of me, but oh boi ... did I underestimate it.

Working a full time job with 40+ hours per week, doing some freelance work, meeting friends, enjoying hobbies and working on this project really took a toll on me. That's why the project was stagnant for almost 3 quarters of 2019 - and overall a huge mess in the year before, until I decided to resurrect it again around the end of summer 2019.

When the urge to work on this struck me again, I spent around 2 weeks gathering, sorting and checking all previously generated files, data and lists. I came to the conclusion that my project and time management was mostly to blame for almost screwing up this project completely. Also to get the project back on track I had to make some sacrifices ... I was missing certain files, so just starting where I left off wasn't an option. 

Restart

After some thinking I decided to scrap most of my greyboxing and built up the modular system from scratch. I tried to keep as much of the original level design as possible, only making adjustments if necessary. Here I discovered that the old greyboxing was off by a lot. The thing is ... I just started working on it again like before. But now i realized I have to change stuff up to make sure the project won't end up like it already did once.

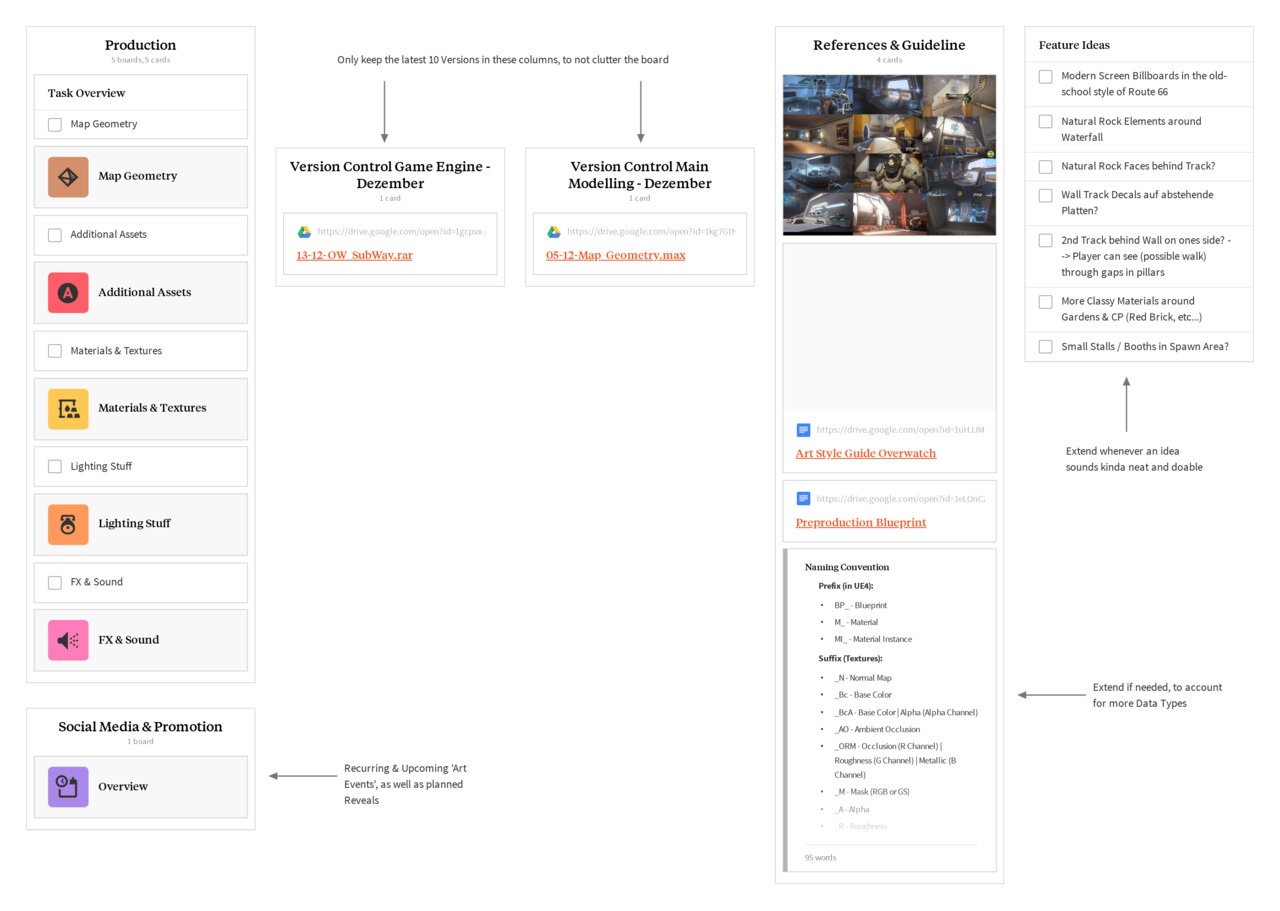
I decided to completely organize the project, including version back-ups, overview boards, task lists and changelogs - most of which probably sound like a normal, must-have thing for anyone else. Also, I'm gonna use this 'Dev Blog' as part of my documentation, so I and people who are interested can comprehend and follow the production & development of this project.

Screenshot Milanote Board

What's next?

This is the start of a multi part blog post series. I don't know how regular I'm gonna post updates, but I'll try to figure that out in the near future. For now I aim for the cycles to be around 2 weeks (maybe a bit shorter during the Christmas holidays). I'm also planning to throw in some random project spotlights of certain parts, breakdowns, analyses and more.

If you like what you see, or think something I show is interesting and you want to learn more about it - don't hesitate - ask me about how it was done. I'll consider making a spotlight out of it, if I have time to do so. :D

To conclude this introduction ... I hope you are looking forward to the next post (aka the real start of the series)! Leave me some feedback or suggestions, they are greatly appreciated.

Cheers :D